VS Code gets a lot of love today, and rightly so, but there’s still something to be said for a text-mode, fully keyboard-controlled development environment. With tools like zsh, tmux, tsserver, and Vim, you’ll find you rarely need to reach over to the rodent on your desk.

In this article I’ll go over some tools that I find useful in my own terminal based environment. As such, this article will focus on Macs, although most of the tools discussed here are also available on Linux. They will generally not be available on Windows unless you’re using Windows Subsystem for Linux or Cygwin, at which point you’re basically using Linux.
I’ll also be pushing vi-style (modal) key bindings wherever possible. I’m a huge fan of Vi’s modal editing system and its associated key bindings. Luckily I’m not the only one; most modern command line tools that have customizable key
bindings support vi-style bindings.
The Terminal
The first thing you need in a terminal based environment is, well, a terminal. You may be using your system’s built in terminal (Terminal.app on a Mac), or you may be using a popular third-party alternative like iTerm2, or maybe you’ve even tried out Hyper in all it’s Electron-ic glory. There are a lot of great options! iTerm2 supports all kinds of bells and whistles like split windows and autocomplete and automatically timestamped commands. Hyper is the web developer’s terminal; it’s written in and extendable with standard web technologies like JavaScript and CSS.
I’ve tried several terminal clients, but lately I’ve been sticking with Apple’s own Terminal.app. The real power of a terminal-based environment comes from the tools running in the terminal rather than the terminal app itself. There’s not as much benefit to having features built into the terminal when they will be replicated by terminal applications.
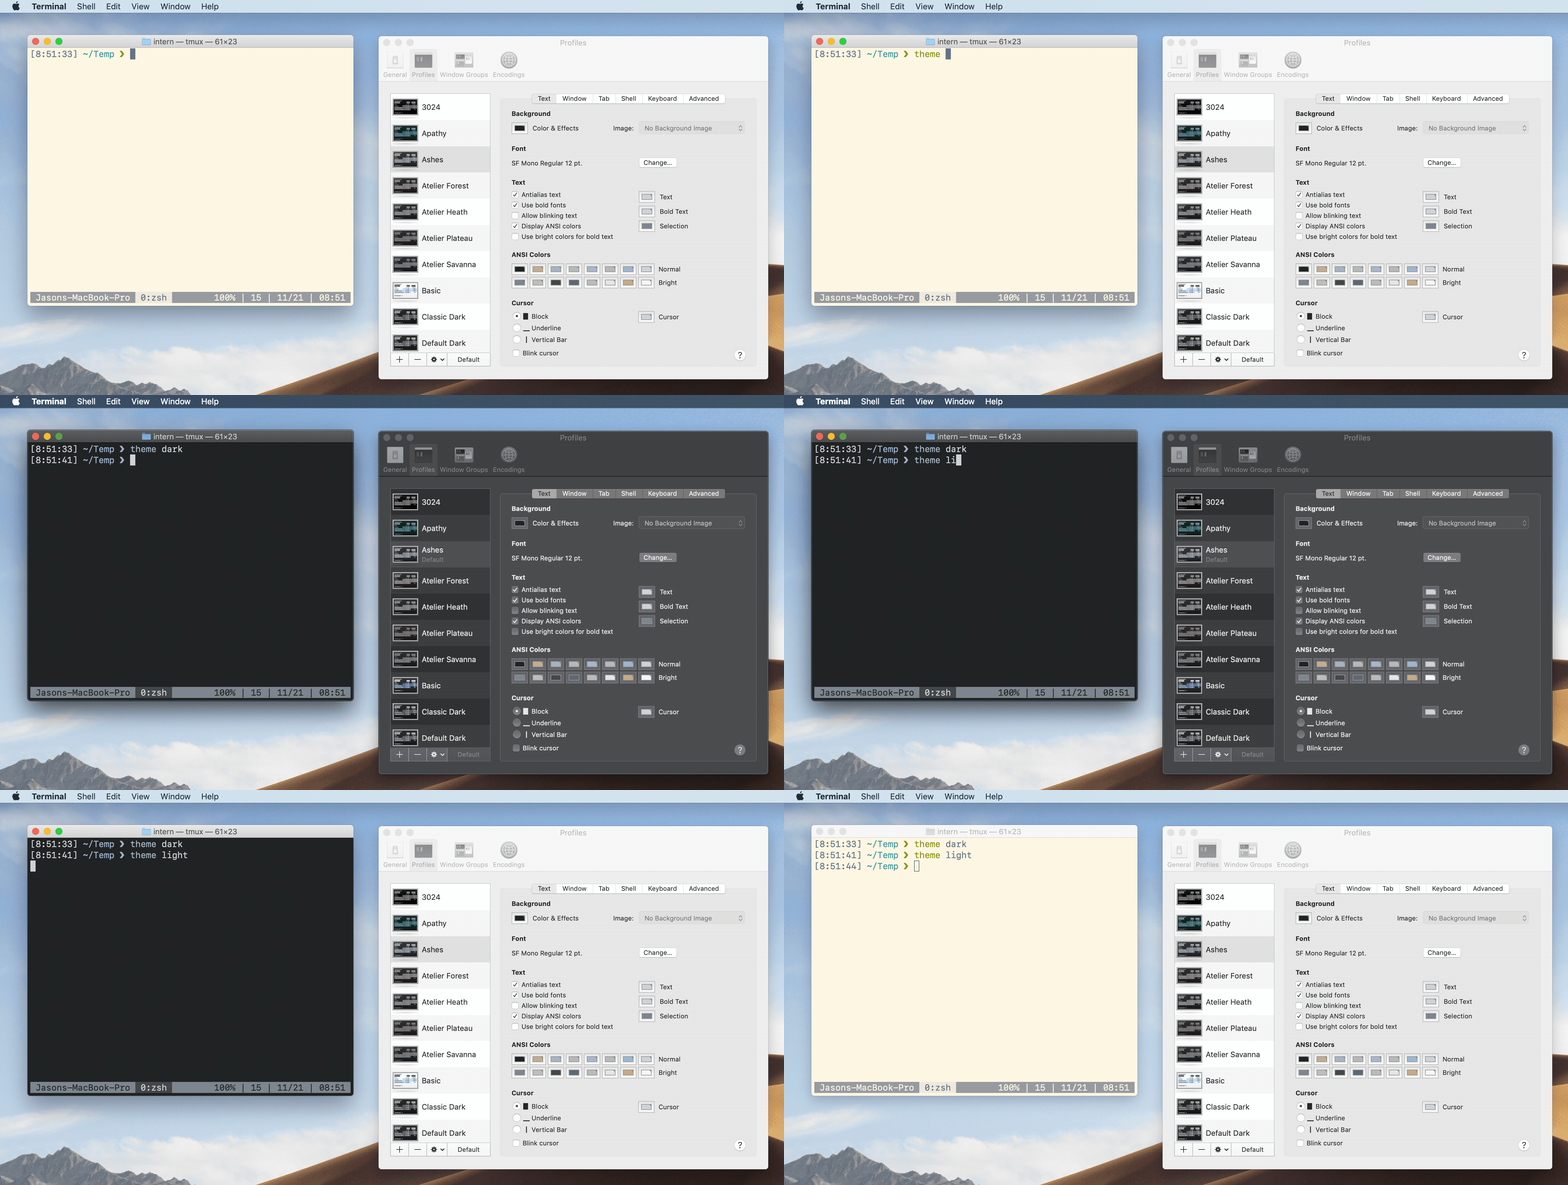
The only real configuration I use for Terminal.app is to change fonts and colors, which are set using Terminal.app “profiles”. I use the same font all the time (SF Mono), so the only difference between the themes I use is the color scheme. I sometimes like to switch color schemes on-the-fly, particularly when transitioning from day to night, so I wrote a simple theme switching script for that; it can be used to dynamically change the theme for all running Terminal sessions (not just the active one), and it also switches the macOS (Mojave) UI mode between light and dark.
To implement my dynamic theming system, first install some profiles for light and dark mode. I use the Ashes and Solarized Light base16 themes that someone helpfully put together for Terminal.app. Whether you’re using stock or third party profiles, you should make sure they’re both using the same font at the same size; this will prevent the terminal from resizing when changing themes.
Next, add the following theme script somewhere in your path:
#!/bin/bash

theme=$1

if [[ $theme == "dark" ]]; then
  dark_mode="true"
  term_theme="Ashes"
else
  dark_mode="false"
  term_theme="Solarized Light"
fi

osascript <<END
  tell application "System Events"
    tell appearance preferences
      set dark mode to $dark_mode
    end tell
  end tell
END

osascript <<END
  tell application "Terminal"
    set current settings of tabs of windows to settings set "$term_theme"
    set default settings to settings set "$term_theme"
  end tell
END
Then experience the magic!
The shell
Now that you have a terminal, you need a shell. Unless you’ve bothered to change your shell, it’s probably bash. Bash is a fine choice, offering a number of useful features including configurable command completion and fancy prompts.
Another popular shell amongst developers, and the one I’ve been using for the last few years, is
- Change directories just by typing the directory name — no
cdrequired! (You’ll need to addset opt AUTO_CDto your~/.zshrcfile.)

- Tab-complete partial paths

- Autocorrection for mistyped commands and directory names

- Powerful built in command completion

- A rich ecosystem of plugins, like syntax highlighting and autosuggestion
In the following sections I’ll describe a few features that I’ve found to be particularly useful.
Key bindings
First things first. Add the following to your ~/.zshrc and run exec zsh.
bindkey -vThere, that’s better.

If you haven’t used it before, zsh’s vi mode is pretty great. It supports all the basic vi commands like hitting b to jump back a word, or dw to delete the word after the cursor. It even supports cut-and-paste and undo!
Plugins
All shells are scriptable…and then there’s zsh. Zsh is all about extensibility. Users have written hundreds of plugins to enhance zsh in various ways, to the extent that multiple plugin management frameworks have sprung up to help deal with them. If you’re already using zsh, you may even be familiar with one or more of its plugin frameworks, like oh my zsh!, prezto, or antigen. These are great and can really simplify the process of trying out new functionality, although most zsh plugins can also be used outside of plugin system.
Some plugins that I find useful on a day-to-day basis are:
- zsh-autosuggestions is a really neat feature inspired by the Fish shell. It will, based on what you’re typing, suggest the most likely command based on what you’ve typed before.

- zsh-completions contains, as its name suggests, more completions. These is the testing ground for scripts that eventual be included in zsh, for commands like
bower,httpie, andmvn. - zsh-history-substring-search is another Fish-inspired feature. It lets you type some part of a previous command, then repeated use arrow or vi keys to cycle through commands that match what you typed.

- zsh-nvm integrates nvm (Node Version Manager) more tightly into zsh, providing shell commands to update and use nvm and configure how it manages installed Node versions.
Completion
Zsh’s completion system is one of its star attractions. Everyone is used to file completion at this point, but zsh can do so much more. Completion scripts can complete all kinds of things, from git branch names to npm subcommands. This is a killer feature for developers since it can make working with shell commands much faster. It’s also great if, like me, you want to see what you changed in a commit that you can’t quite remember the hash for.

There are many, many options in the zsh completion system. The largest of the three manpages for zsh’s completion system (there are more than 10 manpages covering the rest of zsh) is longer than the entire bash manpage. So…for now let’s just turn it on. In your ~/.zshrc, make sure you have the following command (or something like it):
autoload -Uz compinit && compinit -IOne hiccup you might run into is that while zsh includes completion scripts for many, many commands, some applications (I’m looking at you, git) include their own completion scripts that don’t do as much as zsh’s default scripts. The easiest ways to disable particular third-party completion scripts is to remove them from your zsh’s site-functions directory, normally /usr/share/zsh/site-functions or /usr/local/share/zsh/site-functions.
Prompt
Prompt customization is one of the big draws of zsh. Zsh has a built-in prompt theming system, and the various plugin systems provide large numbers of themes to choose from. Zsh themes can set colors, add “widgets” to the prompt, render data on both the left and right sides of the terminal, and can show and hide information as you’re typing a command.
For developers, showing information about the current project repository can be particularly useful. Assuming you’re using git, the plugin options range from a fairly simple inline info widget to a
quasi-graphical repo status line that displays above the main prompt.
I use a relatively sedate set of markers to indicate when I’m in a git repo or using nvm, and to display some basic info about these environments when they’re active. This was my attempt at using zsh’s zstyle styling system, so it’s not the simplest prompt script ever, but it does the job. You can see it in my dotfiles repo. At a high level, the prompt script calls several functions, including git-info and node-info, every time the prompt is redrawn; these functions determine information about the current environment and fill in placeholders in the prompt.

Aliases
You have have noticed some weird commands in the gifs above, like gco. Those are shell aliases. Aliases are nothing new, although zsh makes them particularly powerful, because aliases get to use the completions for the underlying commands. That means my gco alias for git checkout gets to use the completions for git checkout, so hitting Tab on a partial commit hash or branch name will show me useful options.
Much of my command line time is spent with git, so I have around 50 aliases for commonly used git functions. Some of my most frequently used ones include:
- ga:
git add - gco:
git checkout - gcp:
git cherry-pick --ff - gd:
git diff - ggl:
git grep --files-with-matches - gl:
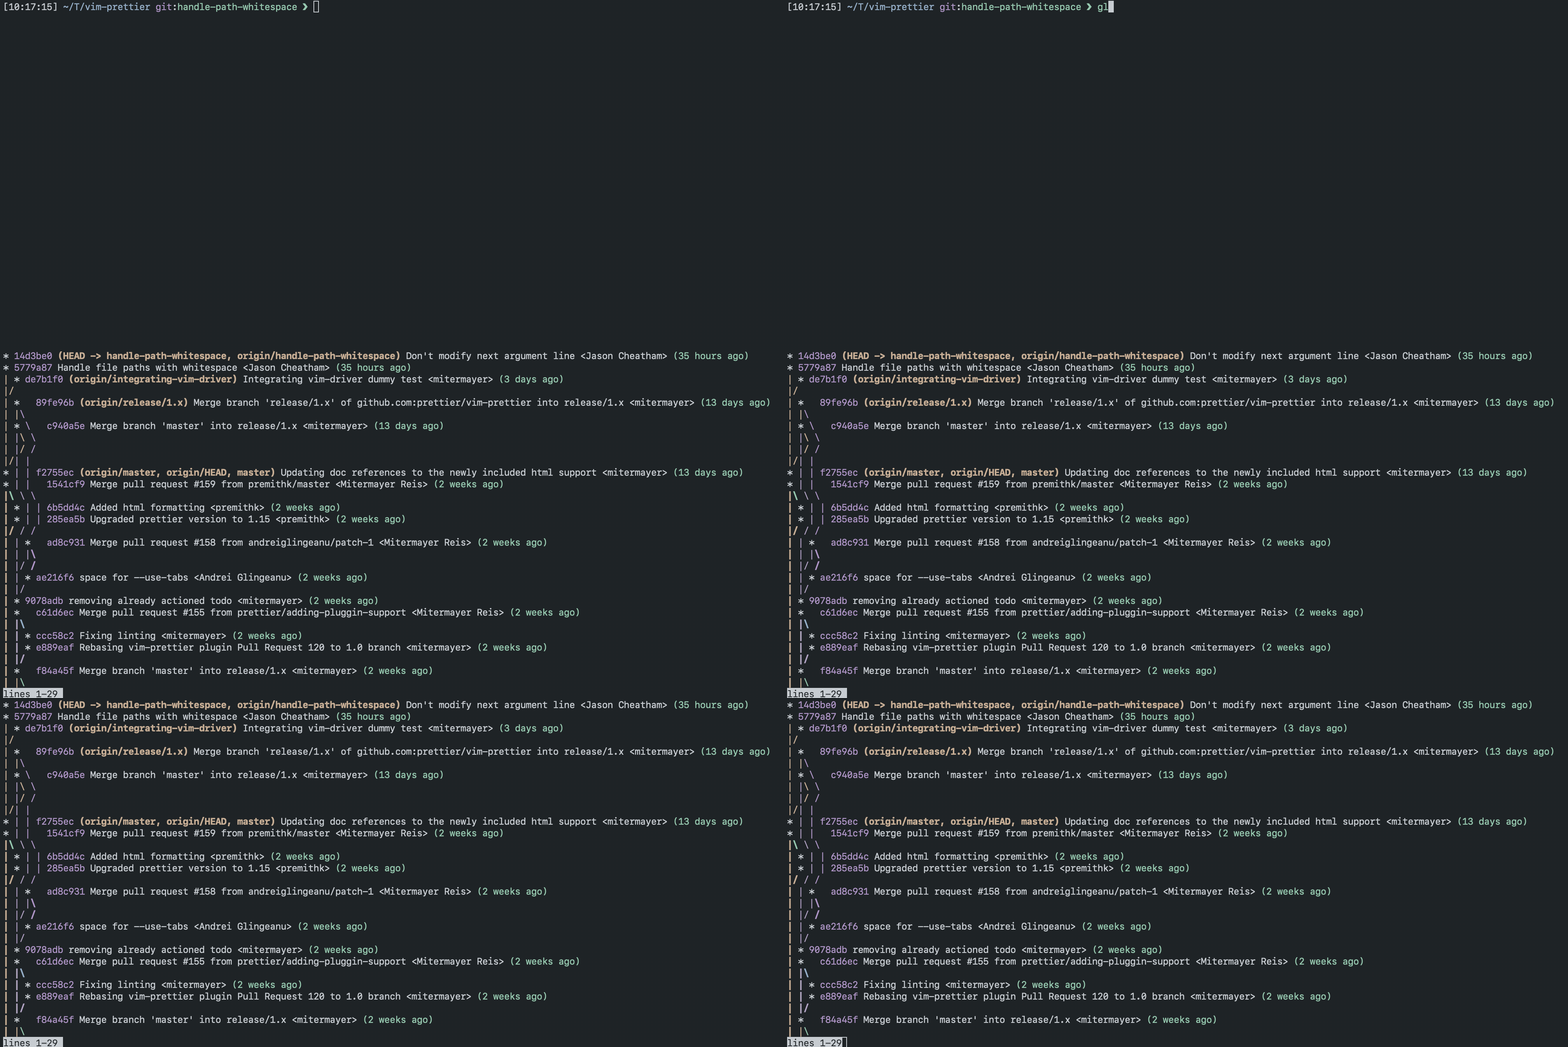
git log --graph --abbrev-commit --date-order --format=format:'%Cblue%h%Creset%C(bold red)%d%Creset %s <%an> %Cgreen(%ar)%Creset' --all - gs:
git status --short
I’m particularly fond of gl. Just look at that ASCII graph!
Terminal multipexing
If you’re using a terminal but you’re not using tmux, you’re missing out. It’s basically a
text-mode window manager, running between the terminal application and the shell and enabling a number of useful features:
- A terminal can be split into multiple virtual terminals
- Virtual terminals can be shared between multiple terminal sessions, even across a network
- A terminal can disconnect and reconnect from a multiplexer session. Your terminal app crashed? No problem! Just restart your terminal and connect to the multiplexer session — your workspace will still be there. This is also great for keeping a session alive between logins in a remote environment.
- The standard window-manager functions, such as creating, resizing, and moving windows, can all be performed with the keyboard.
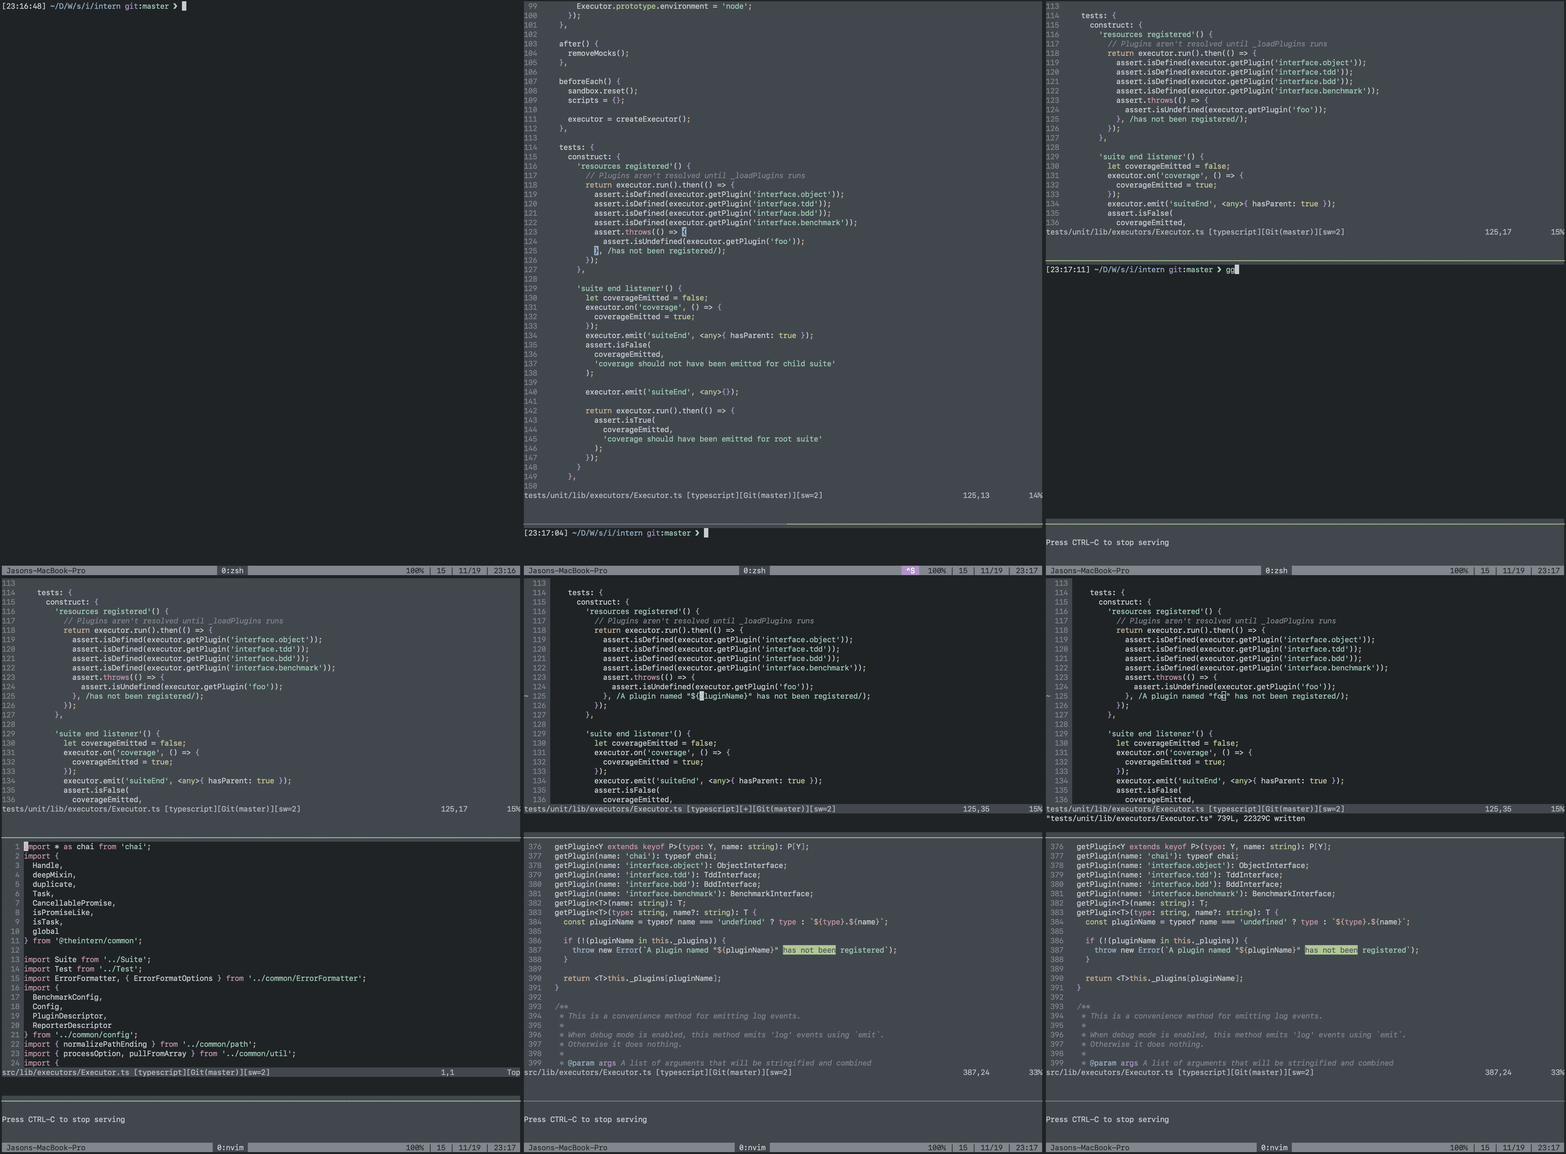
With a terminal multiplexer you’ll be able to create, arrange, and close virtual windows (similar to tabs in a terminal app) and panes (window splits) as needed, so you generally can get by with a single terminal application window. When you do need an additional tab or window, it can be easily added to the tmux fold by opening a new tmux session in the new window/tab. You can also open an existing tmux session in a new window. This allows you to interact with the same session in two different terminal windows, which can be really useful in certain situations. For example, you may be doing work on different virtual desktops (“Spaces” in macOS) and need to shift your work temporarily to a new desktop. With tmux, there’s no need to shift windows around and disrupt your workspace; just open a terminal window in the new desktop and attach it to your existing tmux session. When you’re done, detach the window from your session and close it.
Check out my tmux config to see everything I have setup. Not surprisingly, I like to use vi bindings when interacting with tmux, and there are some other mnemonically useful bindings in there (like ‘|’ to split windows horizontally and ‘-’ to split them vertically).
As with zsh, there’s a plugin manager for tmux called tpm. The plugins I find most useful are:
- tmux-resurrect allows a tmux
server’s state to be saved - tmux-continuum automatically
saves the server state every 15 minutes - vim-tmux-navigator (in
conjunction with a Vim plugin) allows you to transparently move between Vim
splits and tmux panes
Putting it all together, you can do things like edit a file, split the window to start a dev server, split the window again to grep for a string, copy and paste within a pane, and copy and paste between panes, all with the keyboard!
The editor
At last we come to the editor. This is where most of your actual software development will take place. You’ll want something comfortable and easy to use, but also something you can tune to fit your development style. A few conveniences that make life easier would also be nice.

As you may have guessed, I’m partial to Vim, specifically the Neovim variant. Both are great, and scripts and plugins are largely interchangeable between the two of them, but I like Neovim’s development process and its openness to new and interesting features, like integrated Language Server Protocol (LSP) support.
Plugins
As with zsh, plugins are the standard way to add features to Vim. There are a huge number of useful Vim plugins, and much like zsh there are plugin managers to manage them. I don’t use a plugin manager with zsh, but I do with Vim, probably because I use 3 or 4 zsh plugins but closer to 50 Vim plugins. My current plugin manager of choice is vim-plug. It’s easy to configure and makes the task of keeping plugins up-to-date very simple. The full list of plugins I use is in my vimrc file.
IDE features
So, now that you have a plugin manager, what are some useful plugins? The big ones are completions and suggestions (often referred to as “IntelliType”), syntax highlighting, indenting / formatting, and linting. Some day, many of these features will be provided by universal LSP plugins talking to language servers like tsserver. However, we haven’t quite gotten there yet, so you’ll have to mix-and-match a bit.
The easiest way to get completions, suggestions, and live error indications for TypeScript and JavaScript is probably with YouCompleteMe. YCM is the plugin I love to hate. It’s slow to build and difficult to extend, but it’s also very solid and generally snappier than anything else I’ve tried. Eventually I’ll switch to an LSP plugin for language services (error indicators, symbol renaming, jump-to-definition, etc.) and a generic completion framework for as-you-type suggestions, but I haven’t yet found a combination of those that works quite as well as YCM.
Linting is where the situation starts to become a bit tricky. For TypeScript, you can use the typescript-tslint-plugin for tsserver. This integrates linting into the rest of the language services provided by tsserver, and it will therefore work with anything that uses tsserver (like YCM). For other languages you’ll need to use something else, such as ALE. The tricky thing is that ALE can also use language servers (such as tsserver), and it implements many of the things that YCM does, so you’ll be tempted to just use ALE. Then you’ll find out that ALE doesn’t support a feature you want, like symbol renaming, and you’ll want to tweak it just enough to support what you need. That way lies madness. And sometimes pull requests.
You’ll also need to upgrade at least some of your language support files. Vim comes with JavaScript syntax and indent files, but they’re not all that great, and it doesn’t include any TypeScript support by default. I use vim-javascript and vim-jsx for JavaScript and JSX, and typescript-vim and vim-tsx for TypeScript and TSX.
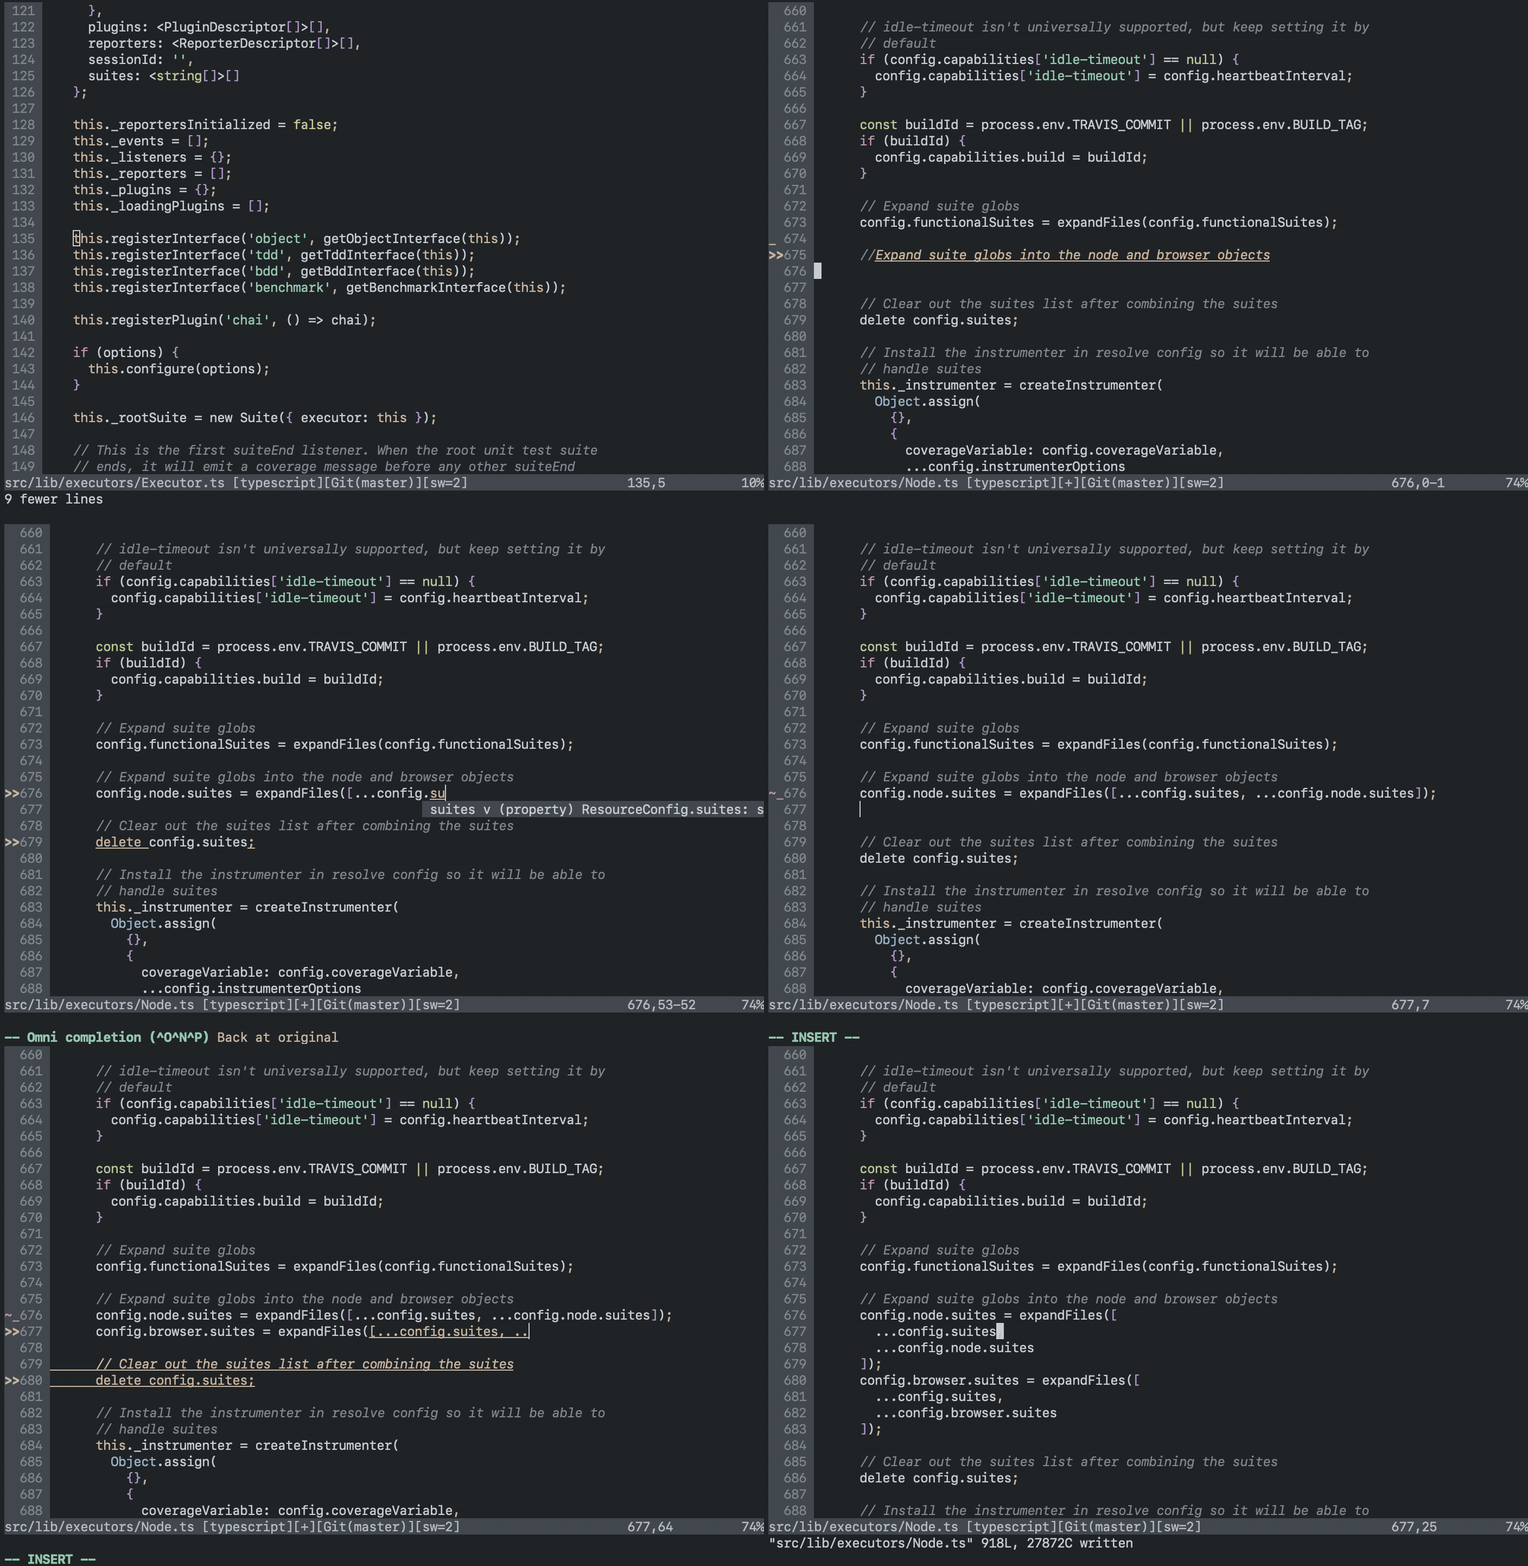
The indent support isn’t really that important, because you’ll be using a formatter to clean up your code every time you save. You will be doing that, right? You should definitely do that. Prettier, and the vim-prettier plugin, are the gold-standard for autoformatting front-end code (JS(X), TS(X), and HTML). It’s wonderful.
Other useful plugins
There are hundreds of general-purpose plugins available for Vim, covering everything from fuzzy-finding files to aligning columns of text to making it easier to add parenthesis around text selections. A few that I find particularly useful are:
- fzf.vim is a plugin that integrates the amazing fzf fuzzy finder into Vim. You can use it to quickly find and open files, buffers, or even lines within the current buffer. It’s async and extremely fast, so it doesn’t suffer from the caching-related issues or incomplete results that plagued earlier Vim fuzzy finders.
- vim-fugitive adds some Git commands to Vim, allowing you to walk through past verisons of files and show blame information
- vim-gitgutter adds markers to the left side of the viewport indicating lines that have been added or modified
- vim-surround adds commands and mappings making it easy to add and remove surrounds (parens, brackets, quotes) from text selections
- vim-flagship is one of many plugins that can be used to configure the Vim status line. (Some status line plugins have even spawned their own suites of sub-plugins.)
- nerdtree is a file explorer sidebar for Vim
- undotree depends on the somewhat unique feature of Vim whereby it stores a file’s change history in a tree-like structure in memory (much like a git commit graph). undotree allows you to view and jump around in the undo history for the current file. You can use this to, for instance, grab that snippet of code you added and then removed 5 minutes ago and paste it into the current version of the file.
One more thing…
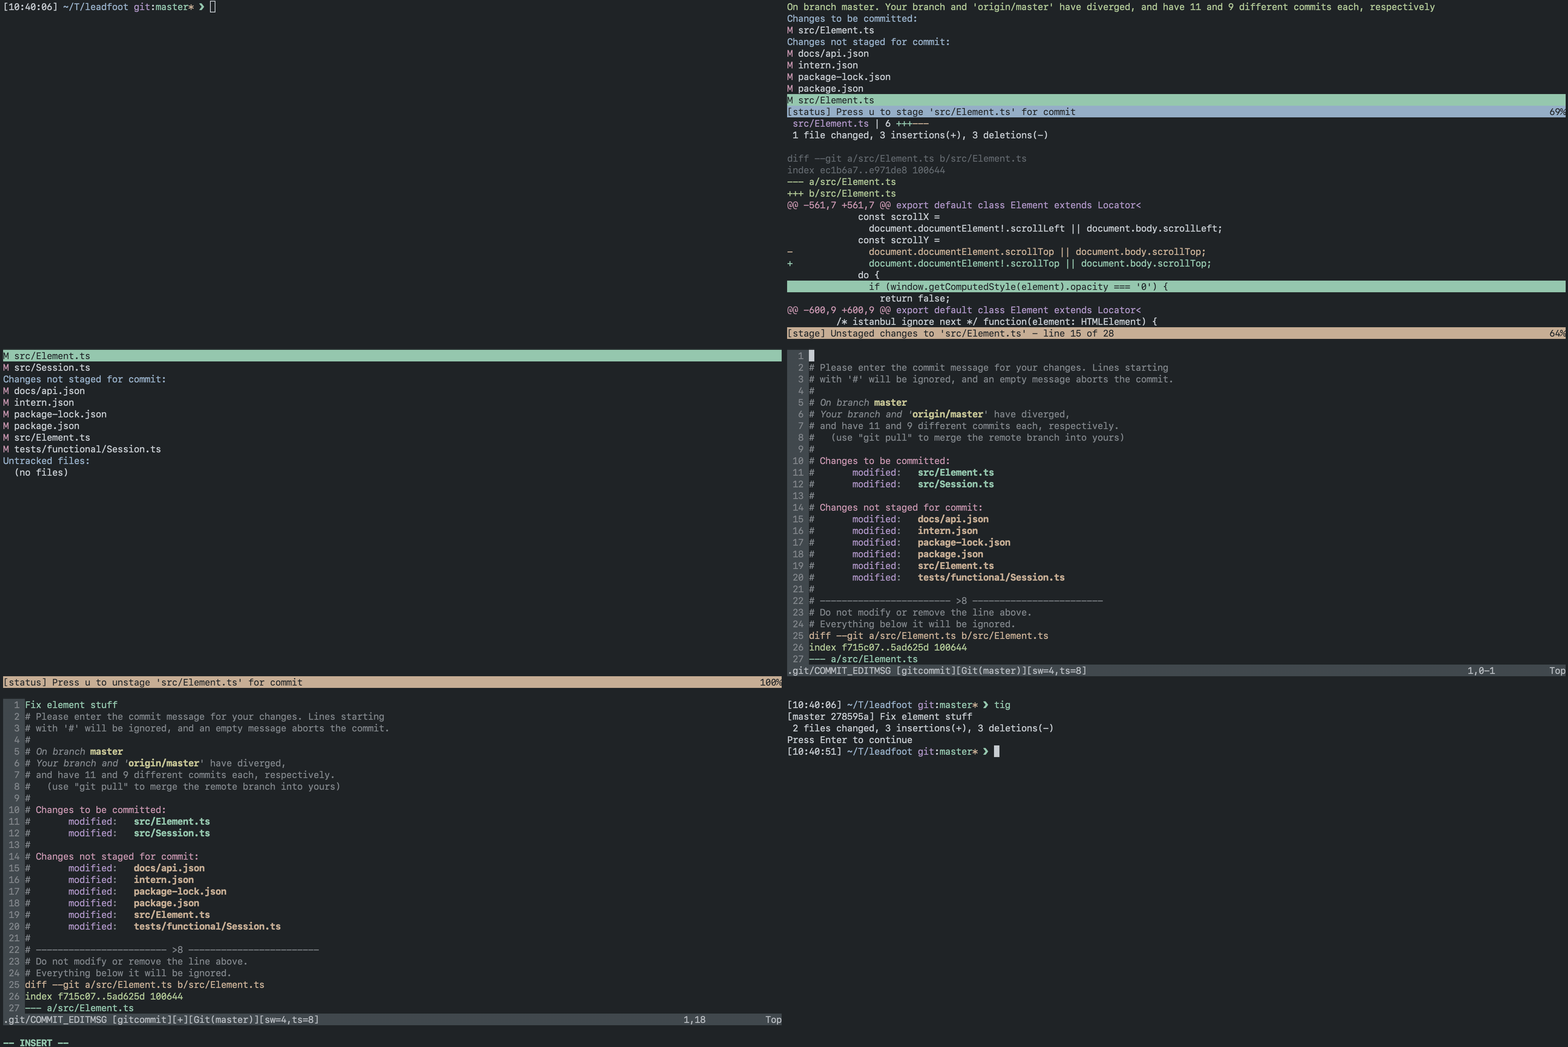
I listed some of my git aliases earlier, and also mentioned some git plugins I use with Vim. (Maybe this article should have been titled “Integrating git with everything”….) Another git-related tool that I use on a daily basis is tig. (LazyGit also looks promising, but I haven’t really gotten used to it yet.) Tig is a full-screen git terminal UI! Pfft, who needs SourceTree?
Tig is a fully featured client that that allows you to view git history, stage commits, and generally exercise most of git’s functionality. What I find it particularly useful for is working with the git index.
Start tig and hit shift-s and you’ll be taken to the Status view. From there you can easily stage and unstage files, chunks, or even individual lines. It’s incredibly useful when you’re trying to generate some clean commits after an
intensive coding session.
Conclusion
In this article I’ve presented a very brief overview of some of the tools I use to create a fully featured terminal-based development environment, and there are so many, many more. Do you have your own bag of carefully cultivated terminal mode tricks? Consider sharing them! GitHub contains thousands of dotfiles repos (the standard term for user config files) showing what other people have come up with to make their own lives easier.
SitePen is always looking for a few more great JS (and/or TS engineers). We work remotely, we focus on creating high quality apps and open source software, and we have solid work-life balance. Check out opportunities to join our team!
